One of the great features of cPanel is its ability to host multiple domains on a single account, which helps to reduce hosting costs (assuming your web hosts allows addon domains) and eases management tasks.
However, there are limitations. For instance, if you need to install an SSL certificate on an addon domain, you will have to first move it to its own account. Otherwise, it won’t be possible to assign it a dedicated IP address (which is required for SSL certificates).
Because cPanel/WHM doesn’t offer an automated way to move an addon domain to its own account, it must be done manually. This tutorial explains how to manually move addon domains to their own accounts.
1. BACK UP ENTIRE CPANEL ACCOUNT
cPanel doesn’t permit the backing up of a single addon domain. While you could manually back up everything through SSH and/or FTP, generating a full account backup will ensure that you don’t leave out any important files.
To back up your cPanel account, click on
Backups > Download or Generate a Full Website Backup from the Files panel and select
Home Directory as the destination.
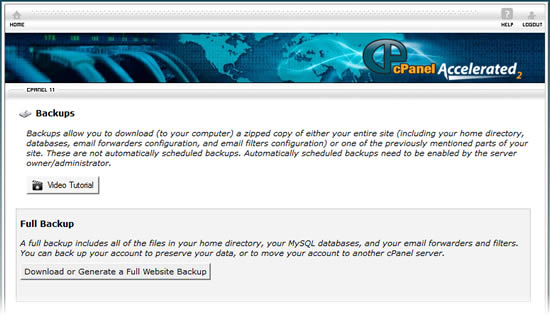
When the backup has completed, download the file to your local computer.
2. CREATE NEW CPANEL ACCOUNT
If you manage your own dedicated server, log in to WHM and create a new hosting account (
WHM > Account Functions > Create a New Account). Alternately, order a additional hosting plan.
If you plan on moving the addon domain to a cPanel account that is hosted on the same server (or by the same web hosting provider), you’ll run into a major problem. It will be impossible to create the new cPanel account until you have deleted the addon domain from the current account (
cPanel > Domains > Addon Domains > Remove), which will result in down time.
While there are some solutions to this (i.e., CloudFlare’s Always Online service), they will not be discussed in this tutorial.
3. UPLOAD BACKUP ARCHIVE TO NEW CPANEL ACCOUNT
The best method to restore files on a cPanel server is probably through SSH, but not all web hosting providers allow SSH access. The following steps are applicable regardless of account limitations.
The first thing to do is to upload your entire backup to a temporary folder (i.e., /restore) on the new hosting account to preserve files and folders that are not compatible with Windows’ file system (such as symbolic links and hidden files) when extracting the content from the backup archive.
4. EXTRACT FILES FROM BACKUP ARCHIVE
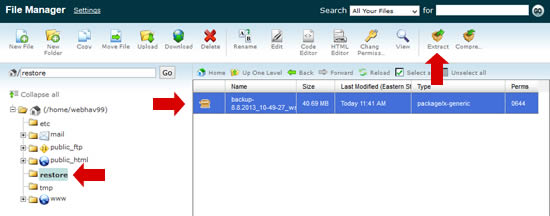
Login to the new cPanel account and launch the File Manager (
cPanel > Files > File Manager). Select the backup file and click the
Extract button.
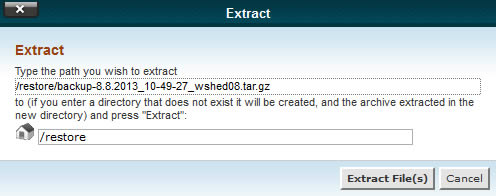
When prompted to enter the path for the extracted files, leave the default in place and click the
Extract File(s) button.
5. RESTORING MYSQL DATABASES
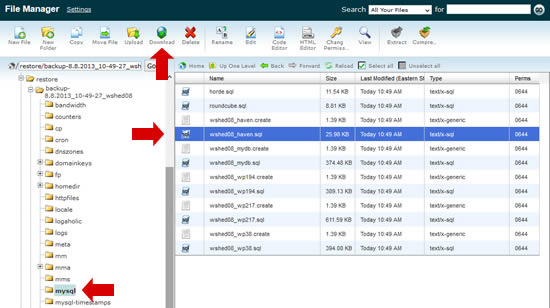
Using the File Manager (
cPanel > Files > File Manager), browse to the directory where you extracted the content from the backup archive. Look for a subdirectory named “mysql.” Select the SQL dump file for your database and click the
Download button.
Before you can restore your database content, you’ll need to create a new, empty MySQL database on the new cPanel account and a MySQL user to access the database. If you don’t know how to do this, contact us.
Next, launch phpMyAdmin (
cPanel > Databases > phpMyAdmin) and select the newly-created database from the left menu. Select the
Import tab at the top and browse your local computer to select the SQL dump file that you just downloaded. Click the
Go button to import the file.
If everything went well, you will see a list of MySQL tables on the left in phpMyAdmin.
6. RESTORE WEBSITE FILES
Using cPanel’s File Manager, browse to the directory where the addon domain files are located. This is usually in a subdirectory of “homedir.”
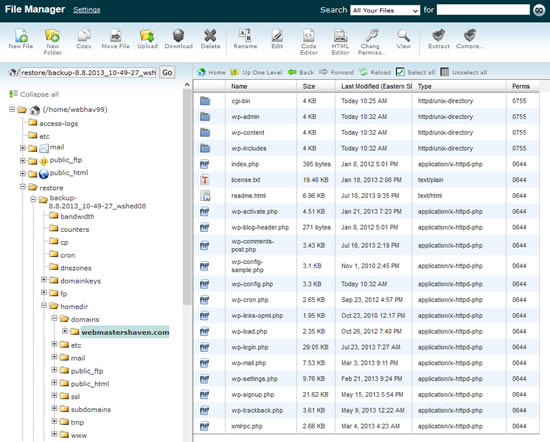
Select the first file (or folder), hold the “Shift” key and select the last file from the directory (select all files). Use your mouse to drag-and-drop the selected files to the “public_html” folder.
For your website to work properly, go through each PHP configuration file to configure the MySQL settings for the new database connexion. You can use the
Edit function from the File Manager to do this.
Once you have made all the configuration changes, try accessing your website to make sure that everything is working correctly.
7. RESTORE EMAIL ACCOUNTS
Launch the File Manager and move the following directories as indicated:
- [backup directory]/homedir/mail/[addon-domain.com] => /mail
- [backup directory]/homedir/etc/[addon-domain.com] => /etc
This will restore all the mailboxes and their content, keeping user passwords intact. Verify this by going to
cPanel > Mail > Email Accounts to make sure that all the accounts are listed after you have restored the files.
OTHER CONSIDERATIONS
While it is impossible to list all of the problems that you might encounter while moving an addon domain to its own account, here are a few more things that you might want to consider before and/or after you move the domain:
- Email forwarders and filters: These are located in /etc/valiases/[domain name] and /etc/vfilters/[domain name], respectively. Unless you have root access to the server, you will have to manually recreate them.
- Nameservers: If you moved the domain to another web host, or if the website’s IP address has changed, make sure to update your nameservers.
- Ownership and permissions: If your website is not working correctly after the transfer, make sure that all the files and folders belong to the new hosting account and that all permissions are set correctly.